Order Entry - Payments
Purpose
This document outlines how to process a customer payment via the Order Entry menu in COSTAR where a tender method needs to be applied to the payment.
Payment Document
- Used to record payments on Account at point-of-sale.
- Allows the cash/EFT application to the Customer's outstanding Invoices;
- This will automatically apply the payment to the oldest documents or you may manually select
documents to be paid.
- When this document is "sold" a Cashier screen will be presented to record the method of
payment and a receipt may be printed on your Invoice printer
The Order Entry Payment document is processed with all of the other Order Entry documents,
requiring a Day End to be performed and then the OW Batch posted before the Payment results are
available on the Customer's Accounts.
- Complete the Customer Information by entering the Customers Account # or use the pull
down to choose the Customer from a list. "Inactive" Customers are suppressed from this
list.
- Complete the "Written By" by typing in your Employee Code or using the down arrow to pick
your code from a list. "Inactive" Employees are suppressed from the list.
The Account Payment detail line appears on the bottom of the document, with a $0.00 Amount. Tab
over to the "Net" Column, enter in the amount of the payment and press the "Tab" key.
Note: If you are unsure of any details involving processing the Payment, on the Toolbar click on
the pulldown next to the "History" Button and use the "Receivables" to locate and review the
Customer's outstanding items.
You are then taken to the "Apply Payment or Credit" Screen which lists "all open items for this
Account"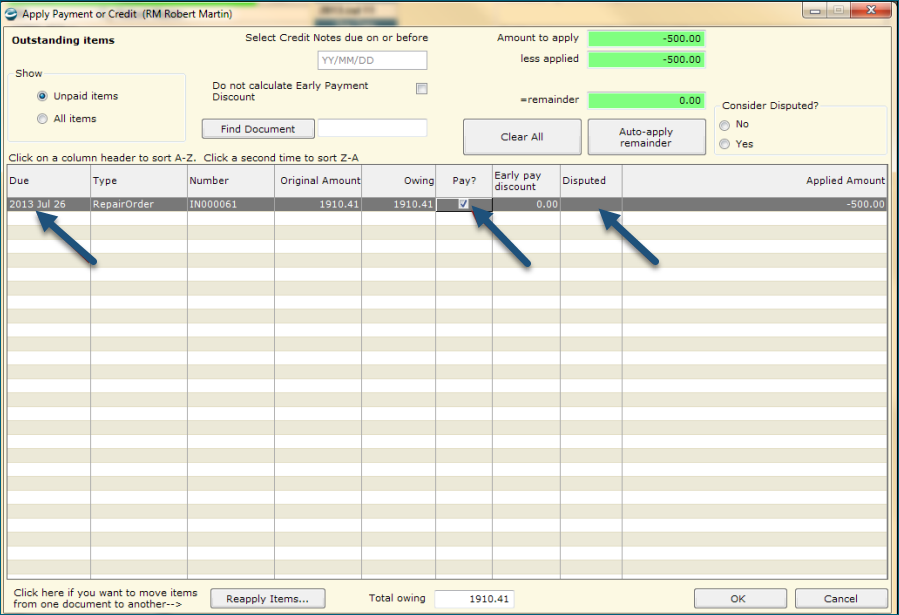
Show: You may show "All Items" or concentrate on just the "Unpaid Items" by clicking on the
appropriate Radio button.
Note: Clicking an a "Column Header" will sort the display A-Z. Clicking the same "Column Header"
again, will reverse the sort of the display Z-A.
Find Document: If you have Customers with many transactions (several screens), then type in the
document number you are looking for. The system will move to and highlight the transaction.
Amount to Apply: The total payment amount entered on the Payment Document is automatically
carried forward to this box. The box acts as a counter, tracking the total, less the applied, keeping
you aware of the remaining amount.
Clear All: Click this button, if you wish to clear the entries you have made and wish a clean re-start.
Auto-Apply Remainder: This button can be used to automatically apply amounts. The program
auto-applies to the oldest items first.
Note: Items showing up in the colour "pink" indicate a "Credit Balance".
Pay Column? Use this column to select certain items.
Re-Apply Items Button: Use this button to "Re-apply" Items". If a payment has been processed, but
has "not" been applied or attached to a document , then the Re-apply button allows you to take the
payment and apply it to the appropriate document. (This allows the documents to offset).
Note: The Re-apply function is also available on the A/R Inquiry screen located in the Customer
Menu. This function is included in A/R Inquiry specifically so that you do not have to open up a
Payment Document for the sole purpose of attaching a Payment to a Repair Order document.
When you have completed applying the payment amount (s), click on the "OK" button and you are
returned to the Payment document.
Click on the Sell button.
The Print screen will appear.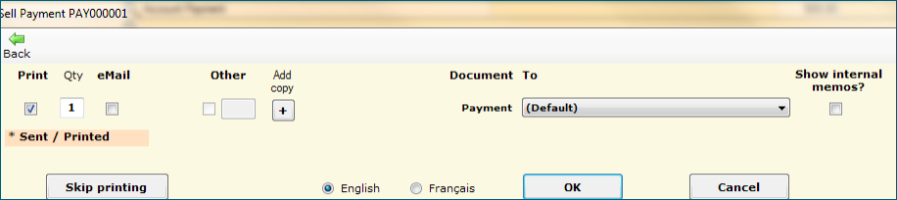
Click on the Print check box, specify the number of copies required, select the appropriate printer,
determine if you wish to show internal memos (if any) and click on the "OK" button.
If you wish to Email the Account Payment document, to your customer, click on the Email
button. Then enter an Email address or choose an address from the drop down list
Note: A Skip Printing option is available so that you are able to process and Account Payment
without printing a receipt.
Next the Cashier screen will appear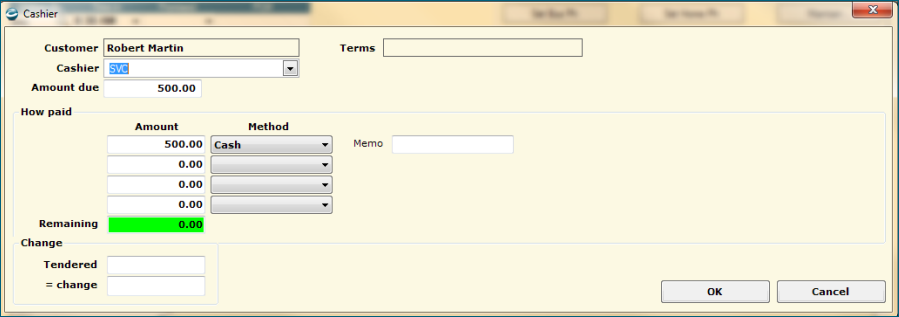
Add the Cashier initials and the amount and method of payment (s).
Click on the OK button
This ends the Payment process, and the Payment document is moved to the Document History file.
However, if you wish to check on the entry, remember that the Payment Entry will "NOT" show up
on the customer’s account until after the Day End has been completed and the Order Writer Batch
for that Day End, has been posted.
Below is sample of on A/R Inquiry, after the Day End and Accounting Batch is posted, which shows
both the original document and the Payment under the History Tab.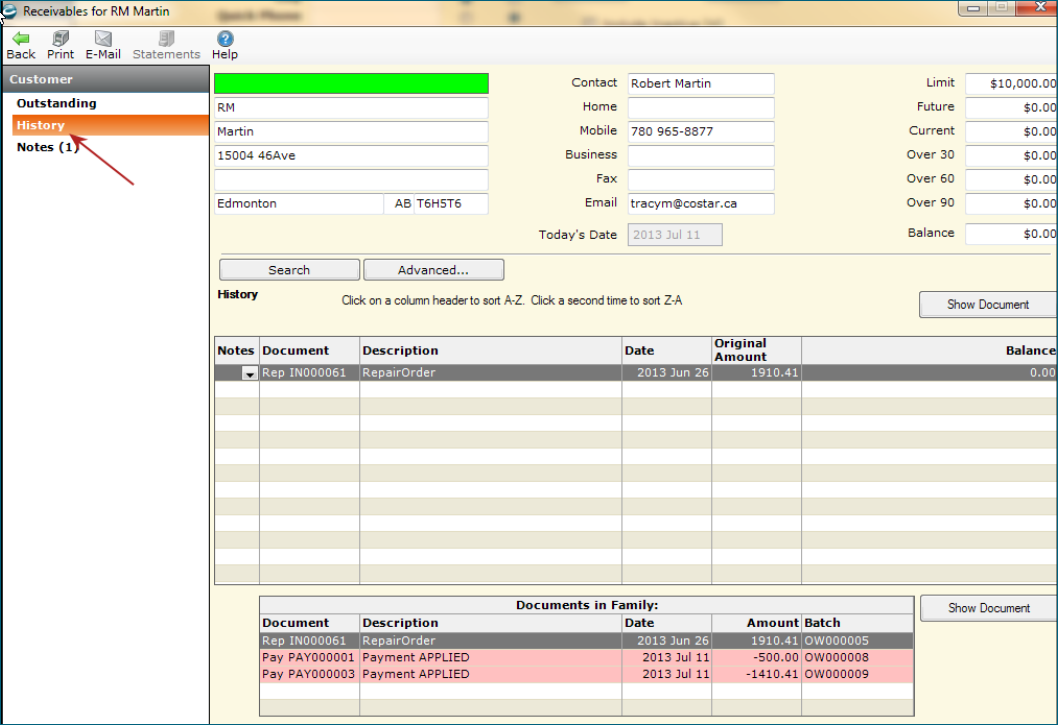
Related Articles
Order Entry Deposits
Purpose This document outlines how to process a customer deposit payment on a Invoice or Repair Order in COSTAR. Adding a Deposit A Deposit can be added to an order entry document if a customer pays a deposit. Deposits are usually paid in advance of ...Adding Order Entry Document Memos
Purpose In addition to manually creating memos on Order Entry documents, Memos in COSTAR can be preformatted, stored, and added as part of a Kit assigned to a Product Type, Item, Service Code or Special Item for use in Order Entry Documents. Creating ...Adding Sub-Totals to a Repair Order or Invoice
Purpose This document details how to add sub-totals to the body of a repair order or invoice. Usage The Order Entry Sub-totals function allows you to provide Sub-Totals on a Repair Order or Invoice. The Sub-totals may be of two main types; IM ST – ...Cleaning Up Old WIP Documents Video
General Ledger Entries and Batch Types
Purpose This document looks at the different types of batches in Costar and how they update the General Ledger. Batch Types in Costar OW – Order Writer Batch RC – Accrued Batch JE – Journal Entry CH – Cheque Run MC – Manual Cheque TC – Tax Clearing ...